So here's a method for bloggers to display only a part of the posts, and not the entire posts. If a visitor wants to read the complete article then he/she will click on the "Read More" link at the bottom of the post, which will be redirected to the particular post.
Steps to follow:
1. Log into the Blogger.com account
2. Go to "Layout" section
3. Back up your current template, by downloading it.
4. Now click on "Expand Widget Templates"
5. Now find this code - ]]></b:skin>
6. Just AFTER that code add these lines
<style>7. Now again find this code : <data:post.body/>
<b:if cond='data:blog.pageType == "item"'>
span.fullpost {display:inline;}
<b:else/>
span.fullpost {display:none;}
</b:if>
</style>
8. And just after this, add these code lines:
<!--READ-MORE-STARTS--><b:if cond='data:blog.pageType != "item"'>
<a expr:href='data:post.url'>Read More!</a>
</b:if><!--READ-MORE-STOPS-->
If you want to shift the "Read More!" text to the extreme-right side, use this code:
<!--READ-MORE-STARTS--><b:if cond='data:blog.pageType != "item"'>9. Now save the template.
<a expr:href='data:post.url'><div style="text-align: right;">Read More !</div></a>
</b:if><!--READ-MORE-STOPS-->
IMPORTANT :Now these adjustments will NOT show your previous posts with "Read More" tag, but you can display them with Read More tags, by editing them with instructions as below:
From now on, whenever making a new post, the part of the post you want to HIDE on your main homepage, write those lines in between these code lines:
<span class="fullpost">WRITE THE PART OF THE POST YOU WANT TO HIDE HERE</span>
See the screen shot below for details:

NOTE 1: After writing new posts, always proof-read your edit HTML section, to avoid mistakes, one such mistake is discussed below:
Make sure, that "Edit HTML", while writing posts looks exactly like this:
<div style="text-align: left;">Post in brief, may include pictures too
<span class="fullpost">Hidden part</span>
</div>
In the above example notice that I have closed span, before div, that placement is very necessary, if you put like this </div> </span>, i.e. closing div first and span later this will NOT work, because span has been started inside div, so it must be closed within div tag.
In case you have multiple paragraphs, while posting a post, and you are giving same textalignment to all the paras, then by default, after every para, the div element will be closed, and again it will start for the next para, so THIS SHOULD NOT be like this, you have to start <div> in the beginning of the post, end it at the last, and make sure <span class="fullpost">Hidden part</span>, is between your div tags.
If you want your previous posts also to hide part of their text, then you must edit them and add span tags to them.
*UPDATE: Now there's a new hack to make all this process automatic: READ HERE about AUTOMATIC READ MORE trick for Blogger.
NOTE 2: If the above method does not work in your blog, here try this second method:
This is a pretty popular Blogger hack that lots of people have asked me about. Instead of answering to each email individually, I thought it would make more sense to write an article about it.
With this hack, you can choose to display a select amount of text from the beginning of each post as a teaser instead of showing the entire post on the front page of your blog. Then when people want to read the rest of the post, they can click a “read more” link to see the full post. This is very handy if you have lots of long articles all on one page. (Note that you’ll need to have post pages enabled in order to make this feature work.)
Step #1 – Update Your Template Code
First you need to edit your existing code so I recommend copying and pasting it into notepad or any text editor. Also, it’s smart at this point to create a backup of your template just in case something goes wrong. Now do a search (CTRL + F) within the text editor for the following code post-header-line-1. This is the default code that Blogger includes but some custom templates remove or change this code so you might have trouble finding it. If you can’t locate this text then try searching for <data:post.body/> instead. Your template will for sure have this since it’s the tag that actually prints the body of your post.
Now depending on which code you were able to find will determine how easy the next steps will be. You might need to do some detective work first in order to get this working properly in your custom template. The idea is to get this new code into your template before the <data:post.body/> tag. Keep reading and hopefully the explanation will illustrate the concept clear enough so you are able to adapt this hack to your custom template.
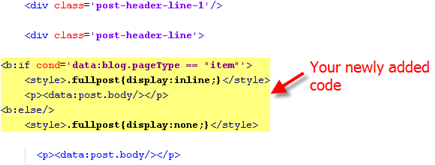
Add the following code below the <div class=’post-header-line-1′/> and <div class=’post-header-line’> tags if you’ve got both.
<b:if cond='data:blog.pageType == "item"'>
<style>.fullpost{display:inline;}</style>
<p><data:post.body/></p>
<b:else/>
<style>.fullpost{display:none;}</style>
The result should look something like this:
If you don’t have the default
<div class='post-header-line-1'/> tag then your result should look something like this instead. This is how it would be done in the MushBlue Blogger custom template: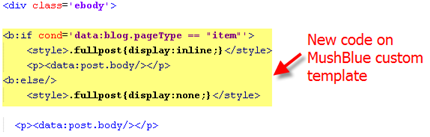
Notice in both examples that the code in yellow and the <data:post.body/> tags are the same — it’s just tag above it that will differ based on the template you’re using.
Now let’s add one more bit of code which will actually create the “read more” link in your post. This code will go below the <data:post.body/> tag so copy the following and paste it in. Feel free to change the “Read more…” text to whatever you want the link to look like. Be careful not to delete any other code during this process.
<b:if cond='data:blog.pageType != "item"'><br />
<a expr:href='data:post.url'>Read more...</a>
</b:if>
</b:if>
Yes, there are supposed to be two </b:if> tags in the above code so don’t think it’ s a mistake. The result should look like this:
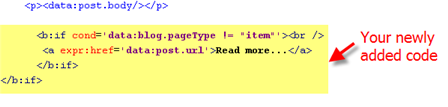
This code will be the same no matter what template you are using. Just make sure it goes below the<data:post.body/> as shown in the image above.
Now let’s look at what the final result should be. Here’s the updated code block you just worked on all put together:
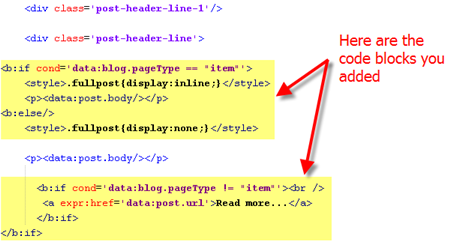
Ok, you’re all done editing the template code. Paste it back into your Blogger html window and save it. If you get an error, you made a mistake. The most common mistake is to accidentally delete a > or < while pasting in the new code. If it saved successfully, it’s time to move onto the next step and modify a quick Blogger format setting.
Step #2 – Add a Class Tag in Your Default Post Template
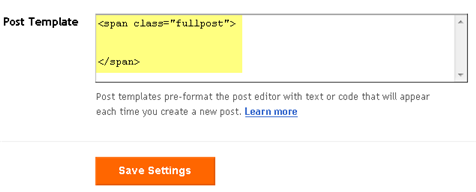
For this step, you need to navigate in your Blogger account to “Settings” => “Formatting” and scroll all the way down to the bottom. It’s the last option called “Post Template”. You’re going to paste in the following code:
<span class="fullpost"></span>You’ll want to keep the spaces in there which will make sense later. After you save this, it will look like this:
Step #3 – Create a New Post
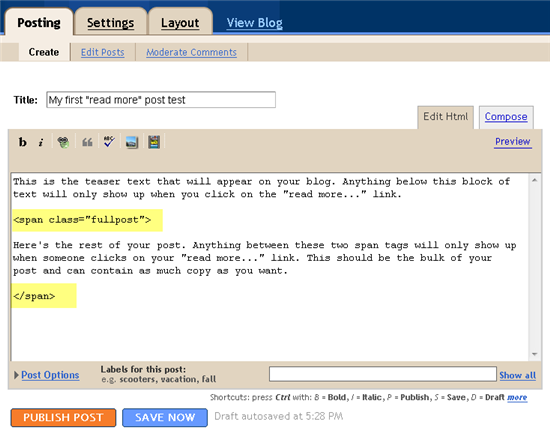
Ok, we’ve got everything all setup so it’s time to go and test it out. Hopefully you’ve got a new post in mind for your blog. If not, then we’ll just create a test post which you can later delete. When you click on the “Posting” tab, you’ll notice that the post text area is now pre-populated with the <span class=”fullpost”> and </span> tags. If not, then you didn’t save it properly so go back and re-read step #2.
So when writing your new post, anything you put above the <span class=”fullpost”> tag will be the teaser text. The main body of your post needs to go in between the <span class=”fullpost”> and </span> tags in order for the “read more…” link to work properly. See the screenshot below. Sometimes pictures illustrate better than words.
Now publish or preview your post to see the “read more” hack working on your blog. If it doesn’t show up for some reason, go back and run through the steps again. Most likely you pasted the code blocks in the wrong places. It’s difficult to troubleshoot these issues since each template can be unique so please make sure to double-check your template before asking for help in the comments section below.
Here’s the live post with the “read more…” link properly working based on the text I used above in the post text area.

Additional Info
If you want to go back and update your old posts with this new “read more…” feature you can. Just go back and edit each post manually. Essentially you’ll need to paste in the <span class=”fullpost”> and </span> tags breaking apart the post into two parts.
For some posts, you might not want to use this feature at all. If that’s the case, just delete the <span class=”fullpost”> and </span> tags from within your new post text area. Then your new post will show up entirely just like it used to before you implemented this hack. Enjoy!
Ready to super charge your blog? Check out our professional premium blogger templates or make money by joining our blog affiliate program!
If you like this post then please consider subscribing to our eBlog Templates RSS feed. You can also subscribe by email and have new templates and articles sent directly to your inbox.
Note: For Watching Online movies Hollywood, Dubbed ,Indian,and Islamic
Downloading Visit :movieshall4u.blogspot.com